InsuraHub Developer Guide
Table of contents
- Setting up, getting started
- Design
- Implementation
- Documentation, logging, testing, configuration, dev-ops
- Acknowledgements
- Appendix: Requirements
- Appendix: Instructions for Manual Testing
- Appendix: Planned Enhancements
Setting up, getting started
Refer to the guide Setting up and getting started.
Return to Table Of Contents
Design
Architecture
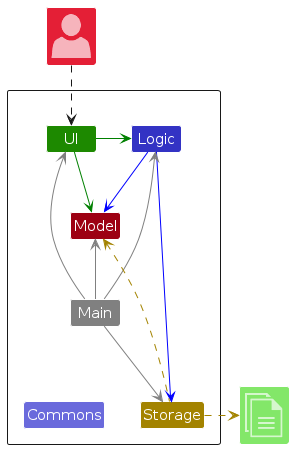
The Architecture Diagram given above explains the high-level design of the App.
Given below is a quick overview of main components and how they interact with each other.
Main components of the architecture
Main (consisting of classes Main and MainApp) is in charge of the app launch and shut down.
- At app launch, it initializes the other components in the correct sequence, and connects them up with each other.
- At shut down, it shuts down the other components and invokes cleanup methods where necessary.
The bulk of the app's work is done by the following four components:
UI: The UI of the App.Logic: The command executor.Model: Holds the data of the App in memory.Storage: Reads data from, and writes data to, the hard disk.
Commons represents a collection of classes used by multiple other components.
How the architecture components interact with each other
The Sequence Diagram below shows how the components interact with each other for the scenario where the user issues the command delete 1.
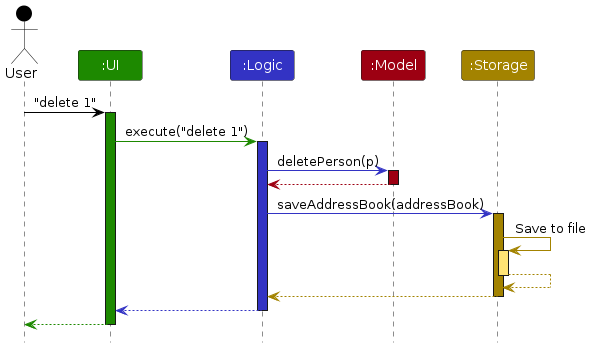
Each of the four main components (also shown in the diagram above),
- defines its API in an
interfacewith the same name as the Component. - implements its functionality using a concrete
{Component Name}Managerclass which follows the corresponding APIinterfacementioned in the previous point.
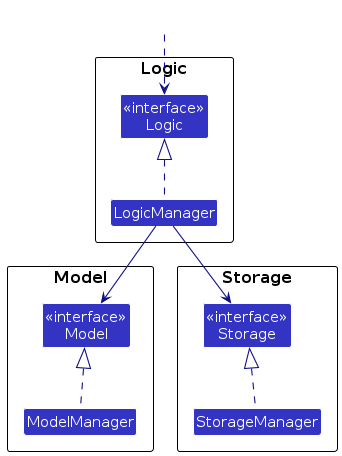
For example, the Logic component defines its API in the Logic.java interface and implements its functionality using the LogicManager.java class which follows the Logic interface. Other components interact with a given component through its interface rather than the concrete class (reason: to prevent outside component's being coupled to the implementation of a component), as illustrated in the (partial) class diagram below.
The sections below give more details of each component.
Return to Table Of Contents
UI component
The API of this component is specified in Ui.java
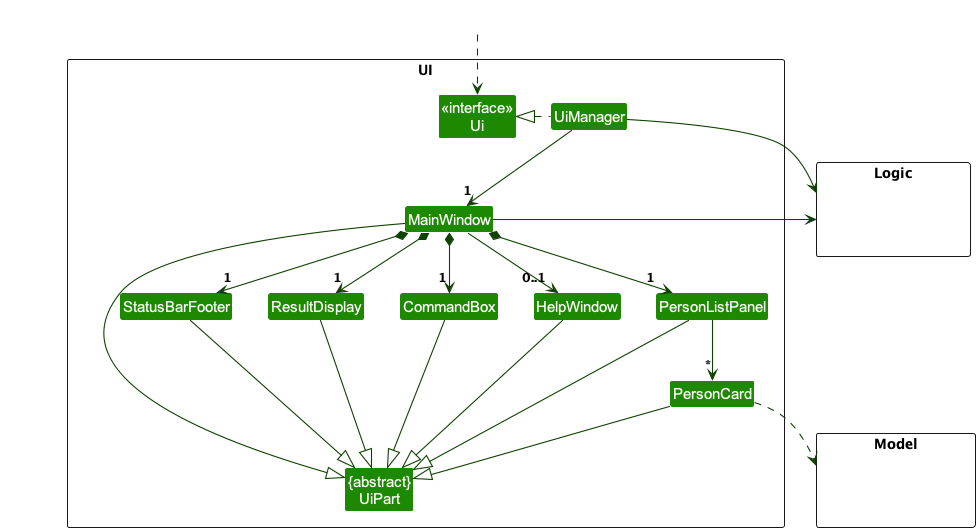
The UI consists of a MainWindow that is made up of parts e.g.CommandBox, ResultDisplay, PersonListPanel, StatusBarFooter etc. All these, including the MainWindow, inherit from the abstract UiPart class which captures the commonalities between classes that represent parts of the visible GUI.
The UI component uses the JavaFx UI framework. The layout of these UI parts are defined in matching .fxml files that are in the src/main/resources/view folder. For example, the layout of the MainWindow is specified in MainWindow.fxml
The UI component,
- executes user commands using the
Logiccomponent. - listens for changes to
Modeldata so that the UI can be updated with the modified data. - keeps a reference to the
Logiccomponent, because theUIrelies on theLogicto execute commands. - depends on some classes in the
Modelcomponent, as it displaysPersonobject residing in theModel.
Return to Table Of Contents
Logic component
API : Logic.java
Here's a (partial) class diagram of the Logic component:

The sequence diagram below illustrates the interactions within the Logic component, taking execute("delete 1") API call as an example.
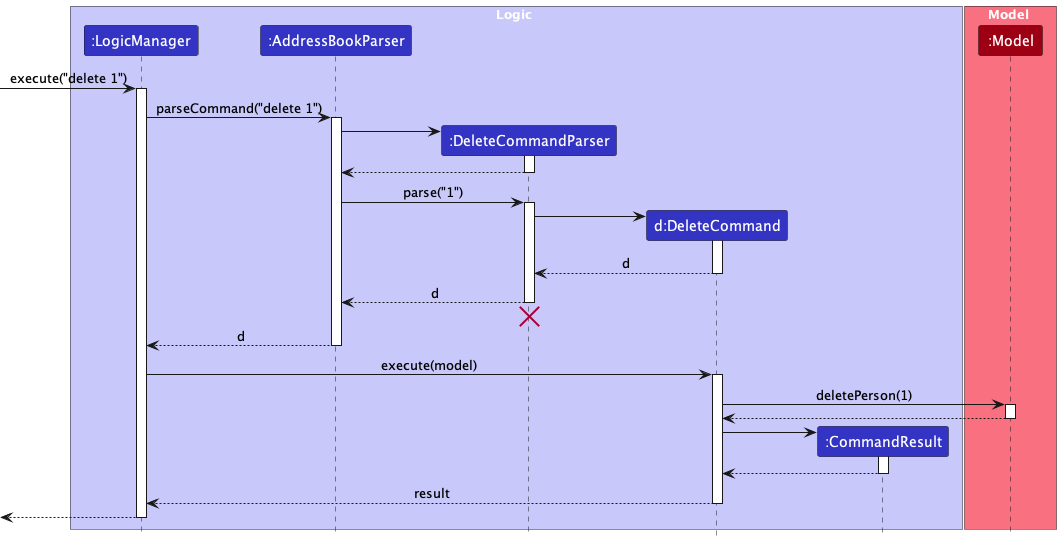
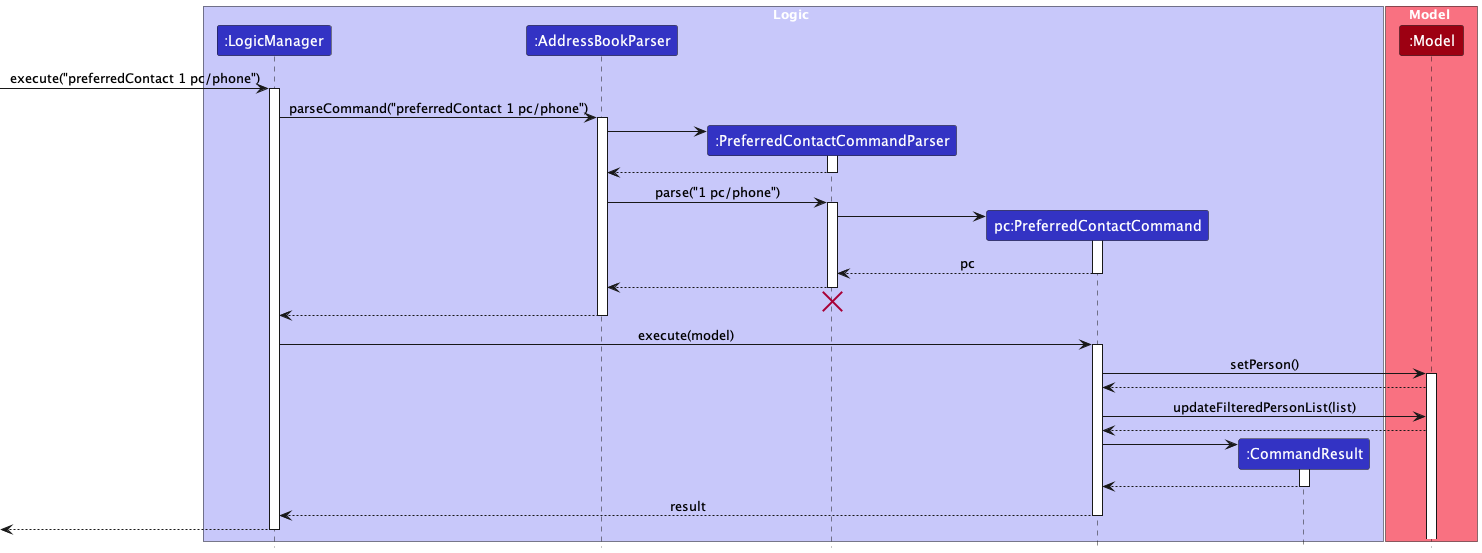
Note: The lifeline for DeleteCommandParser should end at the destroy marker (X) but due to a limitation of PlantUML, the lifeline reaches the end of diagram.
How the Logic component works:
- When
Logicis called upon to execute a command, it is passed to anAddressBookParserobject which in turn creates a parser that matches the command (e.g.,DeleteCommandParser) and uses it to parse the command. - This results in a
Commandobject (more precisely, an object of one of its subclasses e.g.,DeleteCommand) which is executed by theLogicManager. - The command can communicate with the
Modelwhen it is executed (e.g. to delete a person). - The result of the command execution is encapsulated as a
CommandResultobject which is returned back fromLogic.
Here are the other classes in Logic (omitted from the class diagram above) that are used for parsing a user command:
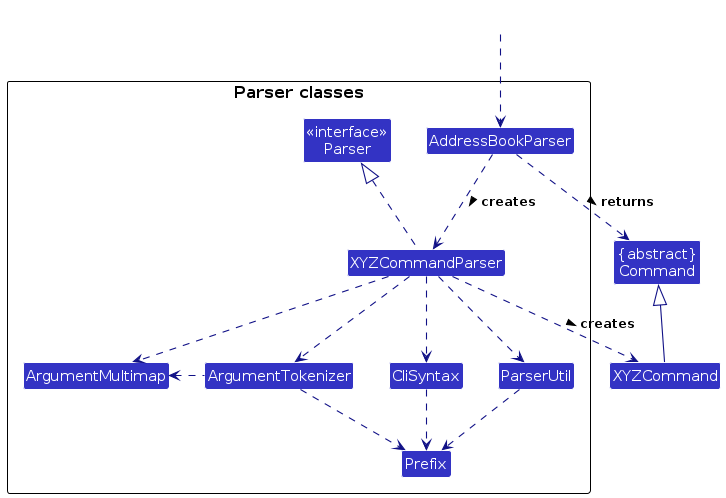
How the parsing works:
- When called upon to parse a user command, the
AddressBookParserclass creates anXYZCommandParser(XYZis a placeholder for the specific command name e.g.,AddCommandParser) which uses the other classes shown above to parse the user command and create aXYZCommandobject (e.g.,AddCommand) which theAddressBookParserreturns back as aCommandobject. - All
XYZCommandParserclasses (e.g.,AddCommandParser,DeleteCommandParser, ...) inherit from theParserinterface so that they can be treated similarly where possible e.g, during testing.
Return to Table Of Contents
Model component
API : Model.java
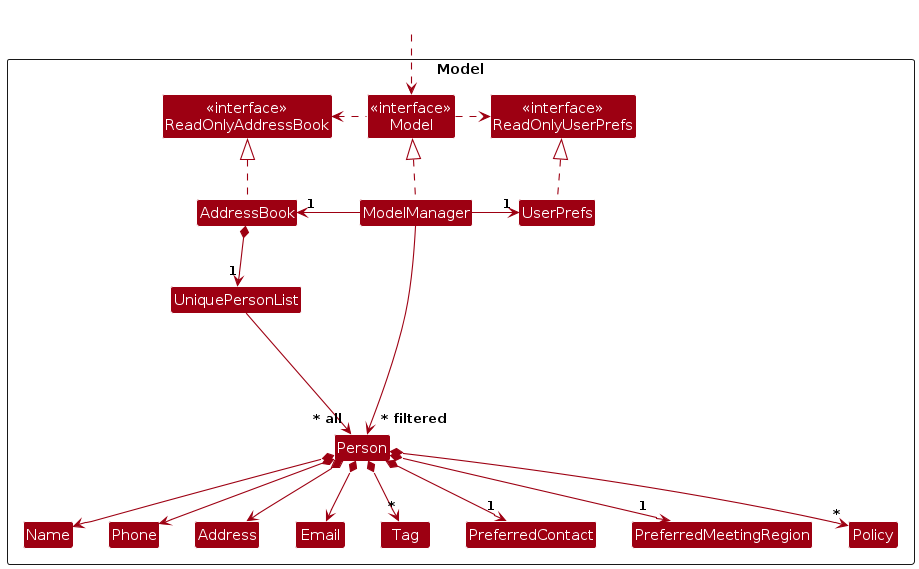
The Model component,
- stores the address book data i.e., all
Personobjects (which are contained in aUniquePersonListobject). - stores the currently 'selected'
Personobjects (e.g., results of a search query) as a separate filtered list which is exposed to outsiders as an unmodifiableObservableList<Person>that can be 'observed' e.g. the UI can be bound to this list so that the UI automatically updates when the data in the list change. - stores a
UserPrefobject that represents the user’s preferences. This is exposed to the outside as aReadOnlyUserPrefobjects. - does not depend on any of the other three components (as the
Modelrepresents data entities of the domain, they should make sense on their own without depending on other components)
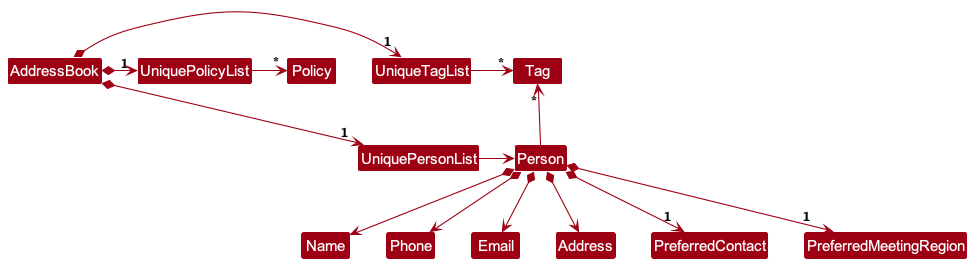
Note: An alternative (arguably, a more OOP) model is given below. It has a Tag list in the AddressBook, which Person references. This allows AddressBook to only require one Tag object per unique tag, instead of each Person needing their own Tag objects.
Return to Table Of Contents
Storage component
API : Storage.java
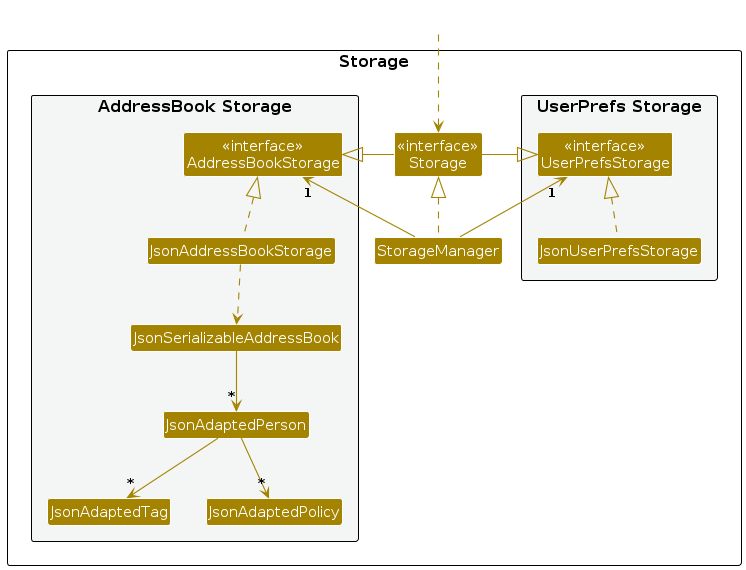
The Storage component,
- can save both address book data and user preference data in JSON format, and read them back into corresponding objects.
- inherits from both
AddressBookStorageandUserPrefStorage, which means it can be treated as either one (if only the functionality of only one is needed). - depends on some classes in the
Modelcomponent (because theStoragecomponent's job is to save/retrieve objects that belong to theModel)
Return to Table Of Contents
Common classes
Classes used by multiple components are in the seedu.addressbook.commons package.
Return to Table Of Contents
Implementation
This section describes some noteworthy details on how certain features are implemented.
PreferredContact feature
Current Implementation
InsuraHub allow users to add/edit the preferred contact method of the client using their index relative to the current list shown in InsuraHub
There is only 2 preferred contact methods
- phone number
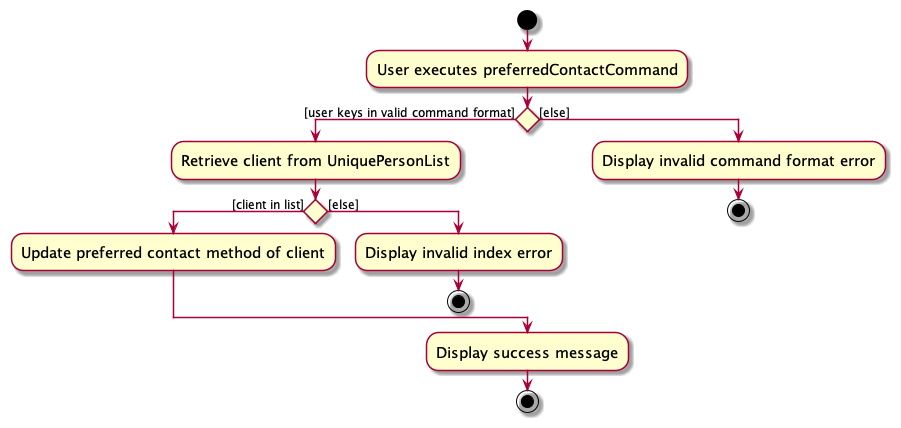
Given below is an example usage scenario and how the PreferredContact mechanism behaves at each step
- The user launches the application and wants to add a preferred contact method for a client,
Alex Yeoh, who is already stored in the application. - The user tries to add a preferred contact method using
preferredContact 1. - InsuraHub displays a error message stating
"At least one field must be provided". - The user then tries to add a preferred contact method using
preferredContact 1 pc/phone. PreferredContactCommandParserandAddressBookParserwill check if the command format provided is valid beforePreferredContactCommand#execute()is called.- InsuraHub will check if the client exists in the
UniquePersonList. - If the client exist, the preferred contact method of the client will be updated.
- The result of the execution of the command will then be used to create a
CommandResultobject. - This object will then be passed to
Logic. - The execution will then be over as the preferred contact method will be highlighted and the adding preferred contact command successful message will then be displayed.
The following activity diagram shows how the Preferred Contact operation works:
The following sequence diagram shows how the Preferred Contact operation works:
Return to Table Of Contents
AddTag feature
Current Implementation
The AddTag feature allows users to add tags under a certain client by indexing the client.
Given below is an example usage scenario and how the AddTag mechanism behaves at each step
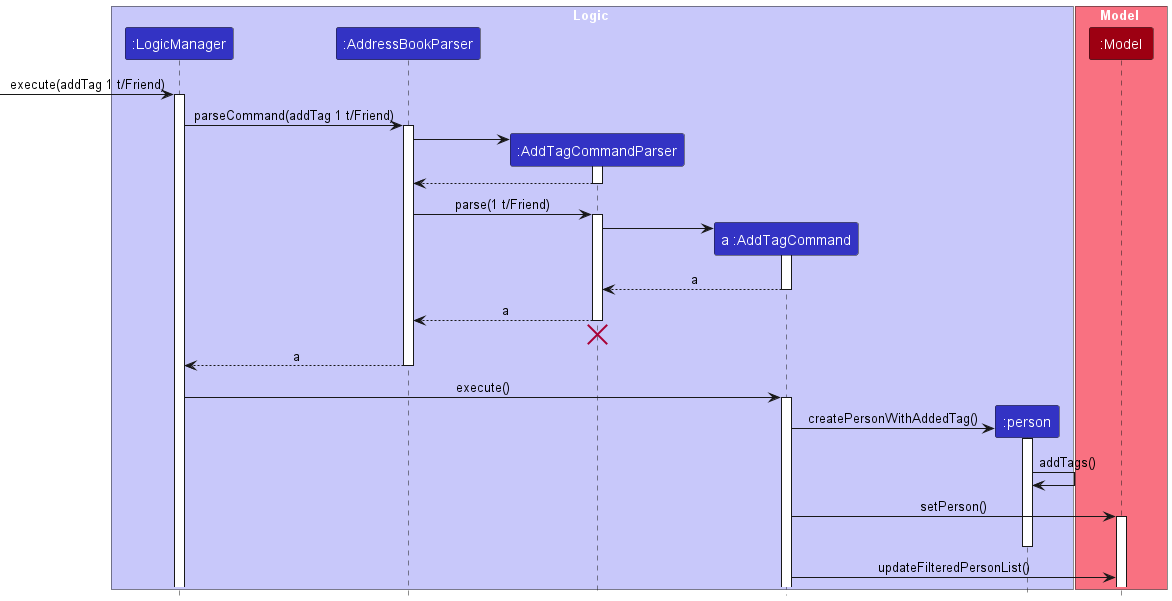
- The user launches the application and wants to delete a tag for
Alex Yeohwho is the first client listed in InsuraHub - The user wants to add the tag
friendto the clientAlex Yeohby entering the commandaddTag 1 t/friend - The
executemethod of the command will then be used to create aCommandResultobject - This calls the
createPersonWithAddedTagmethod which creates a new client with the same details asAlex Yeohbut with the newly added tag - The
modelcalls thesetPersonmethod and updates the targetted client with the newly created client from the previous step - The
CommandResultis then returned by theexecutemethod and the UI will display the updated list of clients withAlex Yeohhaving the newly added tag and a success message is displayed on the UI
The following activity diagram shows how the AddTag operation works:

The following sequence diagram shows how the AddTag operation works:
Return to Table Of Contents
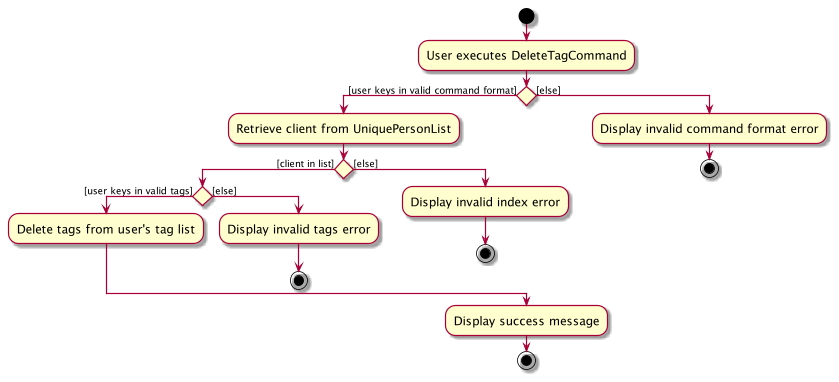
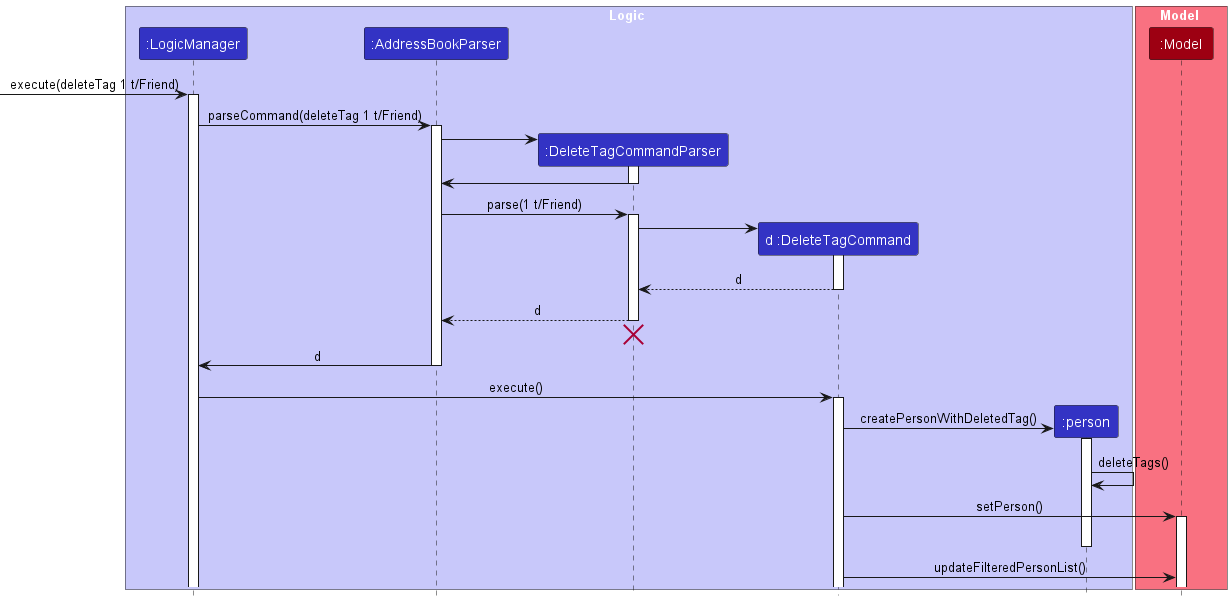
DeleteTag feature
Current Implementation
The DeleteTag feature allows users to delete tags under a certain client by indexing the client.
Given below is an example usage scenario and how the DeleteTag mechanism behaves at each step
- The user launches the application and wants to delete a tag for
Alex Yeohwho is the first person in the InsuraHub - The user tries to delete tag with command
DeleteTag 1 t/friends - InsuraHub displays an error message
Tags provided do not exist. Please provide an existing tag. - Realising that the tag he wants to delete is
friend, the user tries to typeDeleteTag 1 t/friendinstead - The result of the execution of the command will then be used to create a
CommandResultobject - This will then be passed to
Logic - Upon confirmation that the tag exist in the first client of the address book, in this case
Alex Yeoh, the tag is deleted from the UI ofAlex Yeohclient - A successful message is returned, in this case
Deleted tags successfully for person Alex Yeoh; Phone: 87438807; Email: alexyeoh@example.com; Address: Blk 30 Geylang Street 29, #06-40; Tags:
The following activity diagram shows how the DeleteTag operation works:
The following sequence diagram shows how the DeleteTag operation works:
Return to Table Of Contents
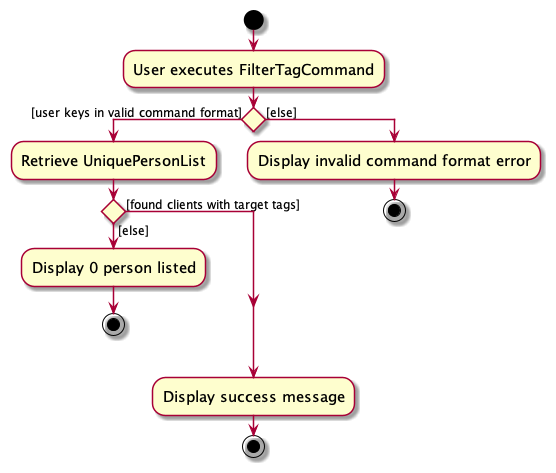
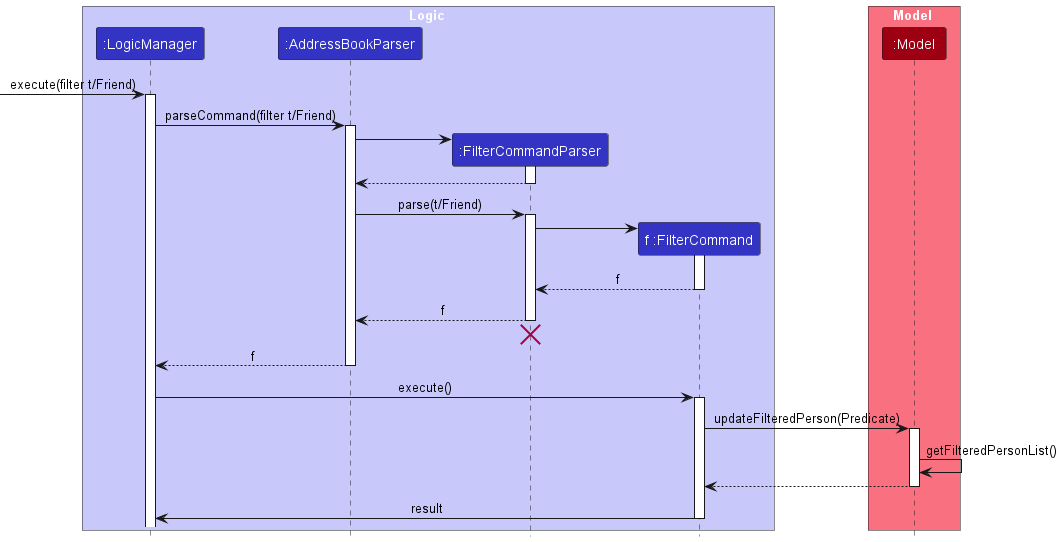
Filtering by Tag feature
Implementation
The proposed tag filtering mechanism is facilitated by FilterCommandParser, FilterCommand, and FilterTagPredicate.
The FilterContainsKeywordsPredicate implements the Predicate<Person>class which implements the test operation:
test(Person)- Checks through theSet<Tag>of the Person passed to the method for the target tag being filtered.
The FilterCommandParser created by the AddressBookParser parses any filter command to create
a FilterCommand object which calls its execute method and the updateFilteredPersonsList method of the Model is
called with the FilterContainsKeywordsPredicate object as its parameter.
Given below is an example usage scenario and how the tag filtering mechanism behaves at each step.
The user launches the application. The current
filteredPersonListis simply a list of all Person objects in theAddressBook.The user executes
filter t/Friendcommand to filter for all Person objects in the address book with the tagFriend'. Thefiltercommand calls theParseCommandmethod of theAddressBookParserwhich returns aFilterCommandParserobject.The
FilterCommandParserobject then calls itsparsemethod, returning aFilterCommandobject which is executed by theLogicManager, calling theupdateFilteredPersonListmethod of theModel.The update list of filtered
Personobjects are then displayed on the ui.
The following activity diagram shows how the Filter tag operation works:
The following sequence diagram shows how the Filter tag operation works:
Return to Table Of Contents
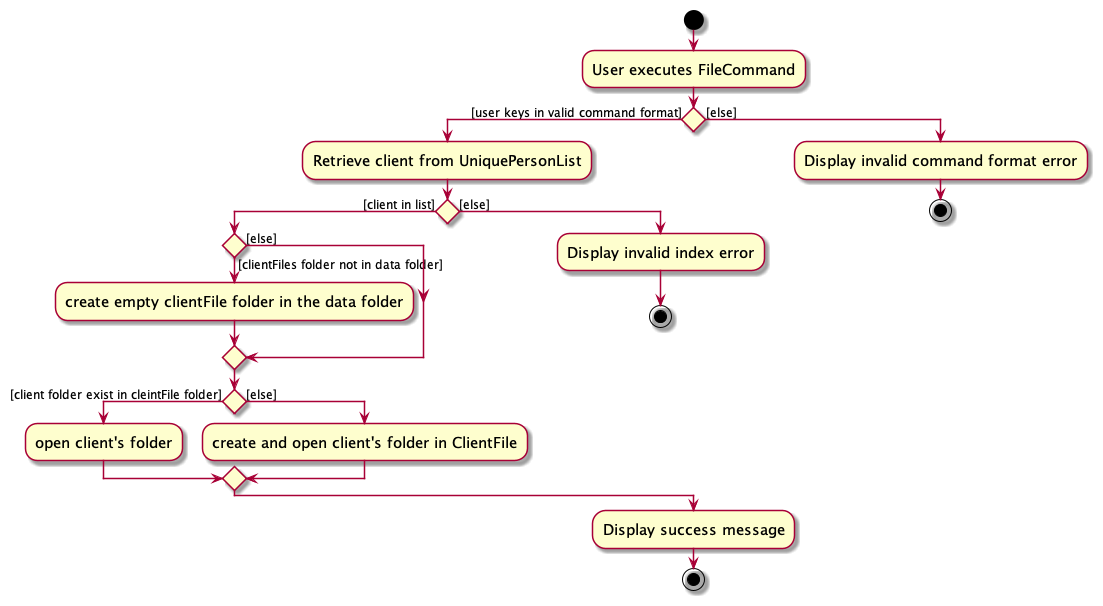
File feature
Current Implementation
InsuraHub allow users to open a folder unique to each client to store their files using their index relative to the current list shown in InsuraHub
these folders are stored in a main folder called ClientFiles in the main directory of InsuraHub
Given below is an example usage scenario and how the file mechanism behaves at each step
- The user launches the application and wants to file certain documents for a client,
Alex Yeoh, who is already stored in the application shown as the first person on InsuraHub. - The user tries to open a folder for the client with command
file 1 - InsuraHub will fetch the 1st client currently shown, if the index 1 is not out of bound in the list.
- If the index is valid, the
Nameof the client will be used as the folder name for the client. - If the folder with the folder name does not exist then the folder will be created and placed in the ClientFiles folder.
- The folder in the ClientFiles folder with the folder name will be opened.
- The execution will then be over as the user can now drop files for the client into this opened folder, file command successful message will be displayed.
Activity diagram for File Command:
Return to Table Of Contents
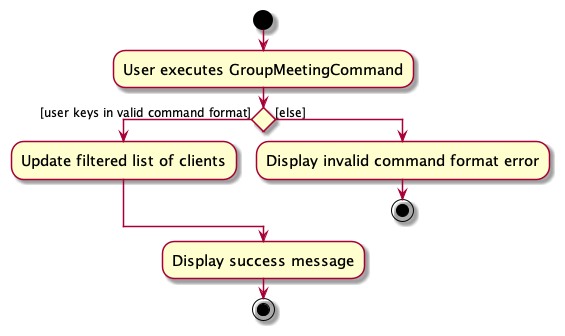
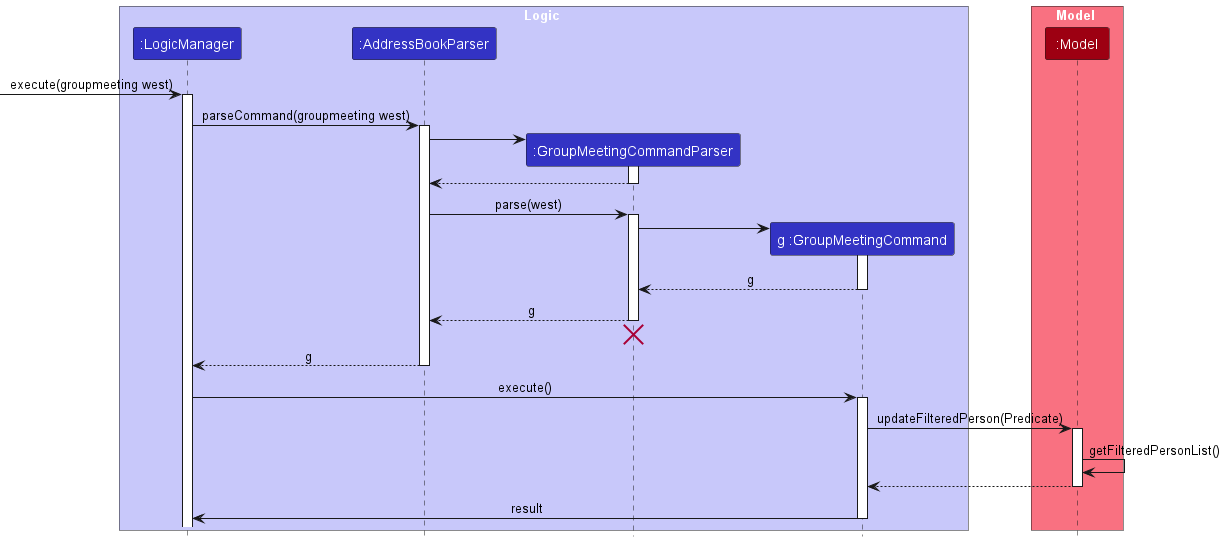
GroupMeeting feature
Current Implementation
InsuraHub allow users to filter based on the client preferred meeting region
There are only 5 preferred meeting regions:
- north
- south
- east
- west
- central
Given below is an example usage scenario and how the Group Meeting mechanism behaves at each step
- The user launches the application and wants to group all clients who prefer to meet in the west as he/she is planning to meet clients who live in the west.
- The user tries to filter clients using
groupmeeting. - InsuraHub displays a error message stating
"At least one region must be included". - The user then tries to filter clients using
groupmeeting west. GroupMeetingCommandParserandAddressBookParserwill check if the command format provided is valid beforeGroupMeetingCommand#execute()is called.- InsuraHub will check if users in the list fulfills the
GroupMeetingContainsKeywordPredicate - The result of the execution of the command will then be used to create a
CommandResultobject. - This object will then be passed to
Logic. - The execution will then be over as the updated list of filtered
Personobjects are displayed on the Ui
Activity diagram for filtering clients based on preferred meeting region:
Sequence diagram for filtering clients based on preferred meeting region:
Return to Table Of Contents
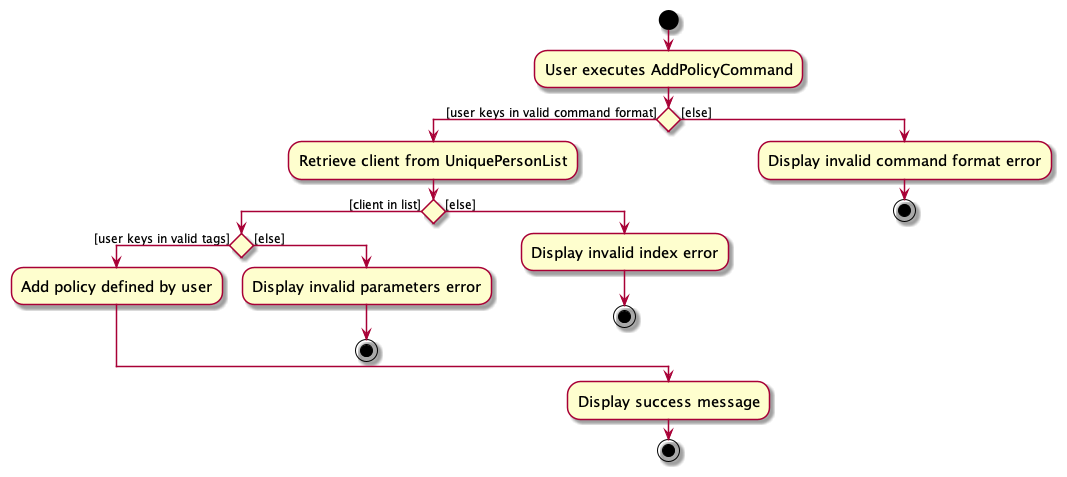
Add Policy feature
Current implementation
InsuraHub allows users to add insurance policies to keep track of new policies that clients have purchased through them
There are 5 attributes for each policy:
- Policy Name (pn)
- Policy Description (pd)
- Policy Value (pv)
- Policy Start Date (psd)
- Policy End Date (ped)
Given below is an example usage scenario and how the Add Policy Mechanism works:
- The user launches the application and wants to add a policy for
Alex Yeohwho is the first client listed in InsuraHub - The user wants to add a policy with
policyName: Health Insurance,policyDescription: Cancer Plan,policyValue: 2000.00,policyStartDate: 2023-01-01,policyEndDate: 2024-12-12 - The user enters the command
addPolicy 1 pn/Health Insurance pd/Cancer Plan pv/2000.00 psd/2023-01-01 ped/2024-12-12 - The
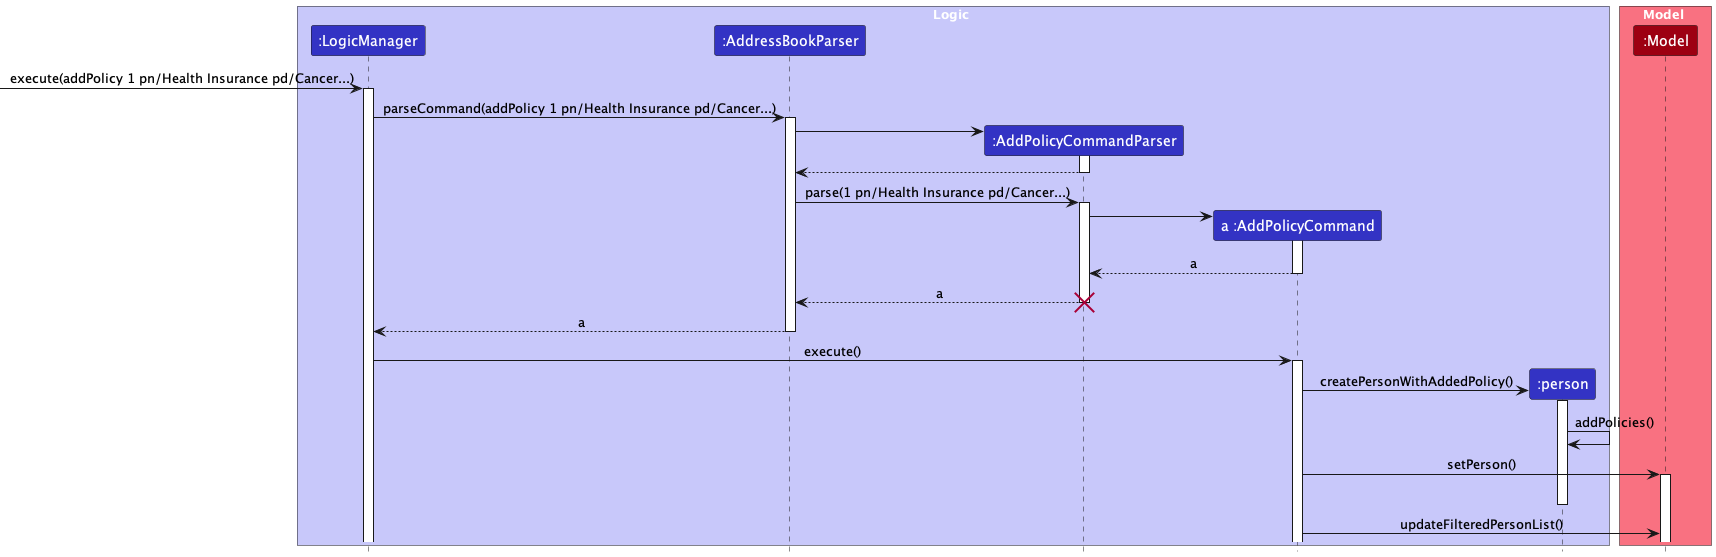
executemethod of theAddPolicyCommandwill be called - This calls the
createPersonWithAddedPolicymethod, creating a new Person object with the same details asAlex Yeohbut with the newly added policy - The
modelcalls thesetPersonmethod and updates the targetted client with the newly created client from the previous step - The
CommanResultis then returned by theexecutemethod and the UI will display the updated list of clients withAlex Yeohhaving the newly added policy and a success message is displayed on the UI
The following activity diagram shows how the AddPolicy operation works:
The following sequence diagram shows how the AddPolicy operation works:
Return to Table Of Contents
Remove Policy feature
Current Implementation
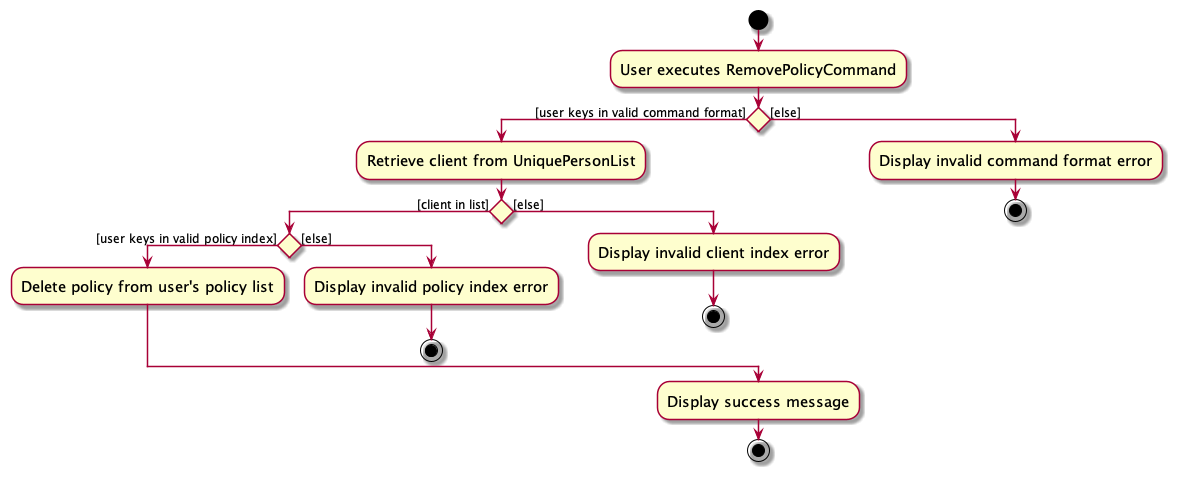
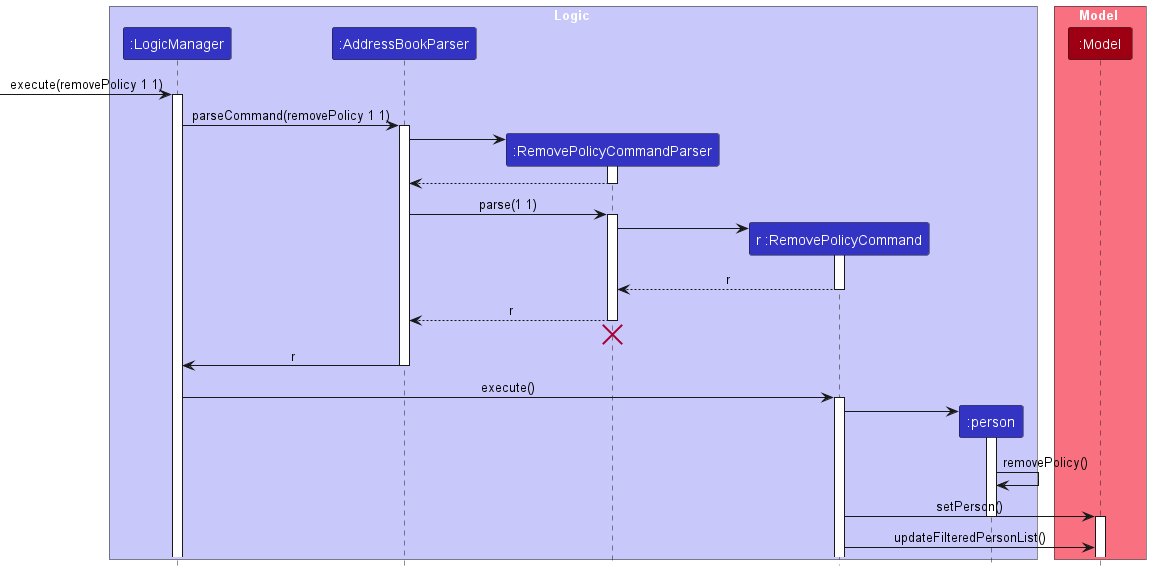
The Remove Policy feature allows users to remove policies under a certain client by indexing the client and indexing the policy to be deleted
Given below is an example usage scenario and how the Remove Policy mechanism behaves at each step
- The user launches the application and wants to remove a policy from
Alex Yeohwho is the first client listed in the InsuraHub UI - The user wants to remove the first (right-most) policy of
Alex Yeohwith commandremovePolicy 1 1 - The
executemethod of theRemovePolicyCommandobject will be called - That will then call the
removePolicymethod on the existing Person object identified by the indexes - The model will then call the
setPersonmethod and updates the targetted client with the policy removed from the previous step - The
CommandResultis then returned by theexecutemethod and the UI will display the updated list of clients withAlex Yeohnot having the policy that was removed and a success message is displayed on the UI
The following activity diagram shows how the RemovePolicy operation works:
The following sequence diagram shows how the RemovePolicy operation works:
Return to Table Of Contents
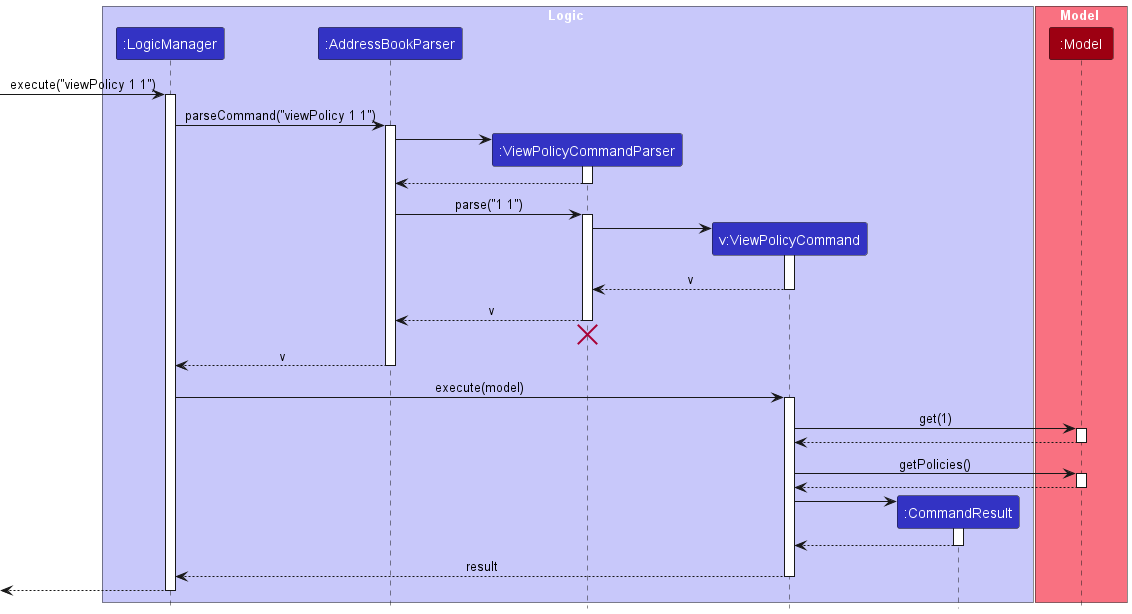
View Policy Feature
Current Implementation
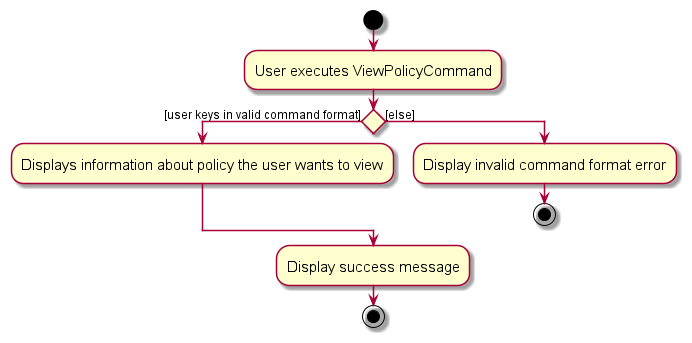
The View Policy feature allows users to view the details of policies under a certain client by indexing the client and the policy
Given below is an example usage scenario and how the View Policy mechanism behaves at each step
- The user launches the application and wants to view the policies of
Alex Yeohwho is the first client listed in the InsuraHub UI - The user wants to view the first (right-most) policy of the client
Alex Yeohby entering the commandviewPolicy 1 1 - The
executemethod of theViewPolicyCommandwill then be used to create aCommandResultobject - This converts the
policyListfrom aSetto aListand uses astreamto index the target policy to be removed - The
CommandResultis then returned by theexecutemethod with thetoString()of thepolicyindexed from the previous step - The UI will display the details of the policy specified by the index and a success message is displayed on the UI
The following activity diagram for viewing policy of a particular Client:
The following sequence diagram shows how the View Policy operation works:
Return to Table Of Contents
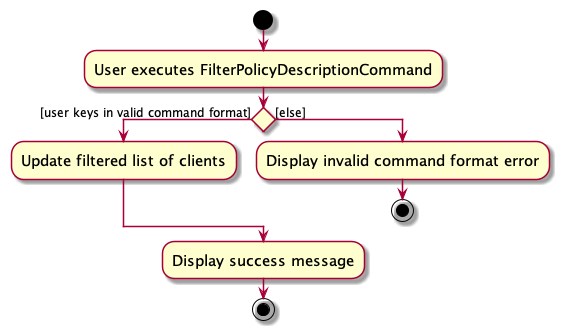
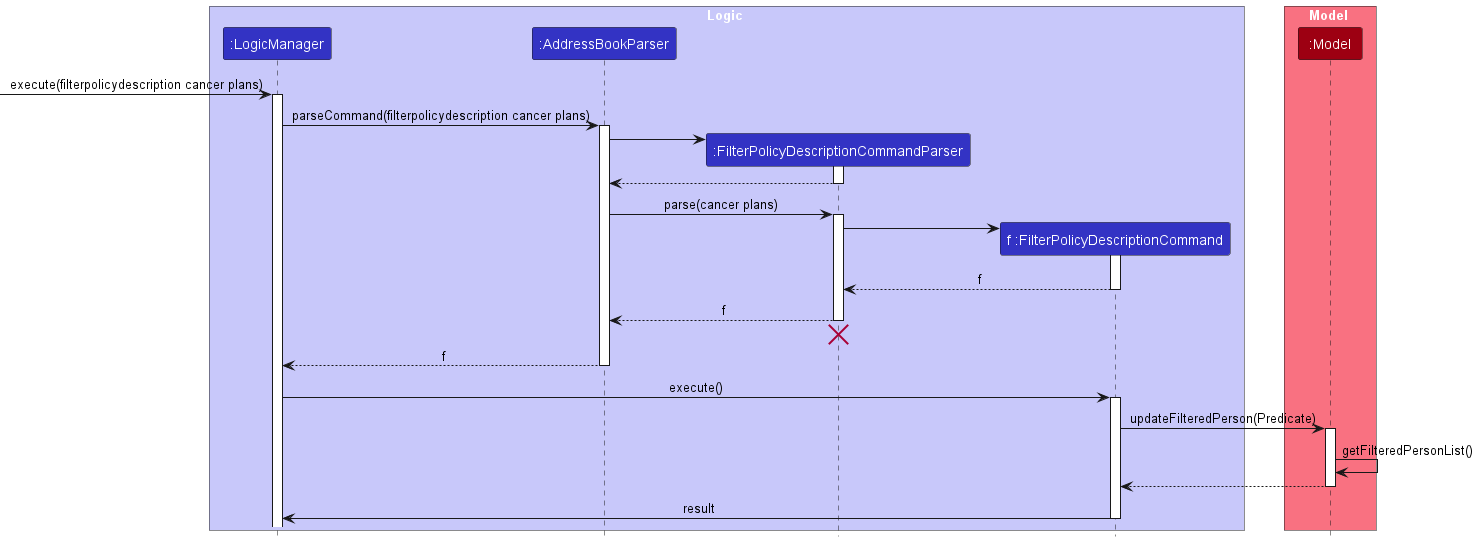
Filter Policy Description feature
Current Implementation
InsuraHub allow users to filter clients based on their policy details, currently only filtering policy description
Given below is an example usage scenario and how the Filter Policy mechanism behaves at each step
- The user launches the application and wants to filter clients who have Cancer Plans
- The user tries to filter clients using
filterpolicydescription. - InsuraHub displays a error message stating
"Invalid Command format"with examples of how to use the command. - The user then tries to filter clients using
filterpolicydescription Cancer Plan. FilterPolicyDescriptionCommandParserandAddressBookParserwill check if the command format provided is valid beforeFilterPolicyDescriptionCommand#execute()is called.- InsuraHub will check if users in the list fulfills the
FilterPolicyDescriptionPredicate - The result of the execution of the command will then be used to create a
CommandResultobject. - This object will then be passed to
Logic. - The execution will then be over as the updated list of filtered
Personobjects are displayed on the Ui
The following activity diagram shows how the Filter Policy Description operation works:
The following sequence diagram shows how the Filter Policy Description operation works:
Return to Table Of Contents
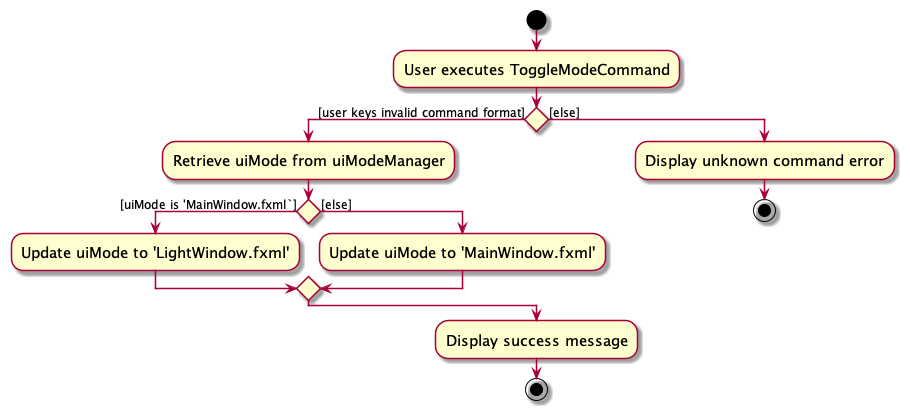
Toggle Mode feature
Current Implementation
InsuraHub allows users to toggle between a dark(default) or light mode to their preference to maximise their productivity
Given below is an example usage scenario and how the Toggle Mode mechanism behaves at each step
- The user launches the application in the default dark mode and wants to toggle it to light mode and enters the command
toggleMode - The
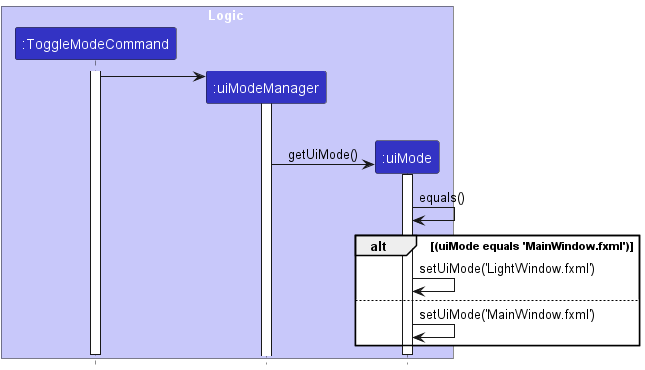
executemethod of theToggleModeCommandis called - The
uiModeManagercalls itsgetUiModemethod and stores the currentuiModein a string - The
uiModeis detected to be the default value ofMainWindow.fxmland is updated toLightWindow.fxml - The
CommandResultis returned by theexecutemethod and the mode of the UI will be switched to Light Mode on the user's next start up of the application - The UI will continue displaying the list of clients and a success message is displayed on the UI
The following activity diagram shows how the Toggle Mode operation works:
The following sequence diagram shows how the Toggle Mode operation works:
Return to Table Of Contents
Change Password feature
Current Implementation
InsuraHub allows users to change the required password to enter InsuraHub
Given below is an example usage scenario and how the changePassword command behaves
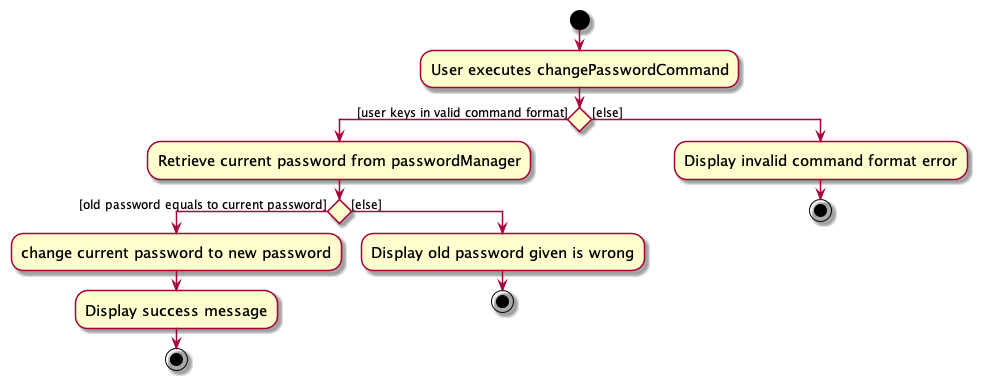
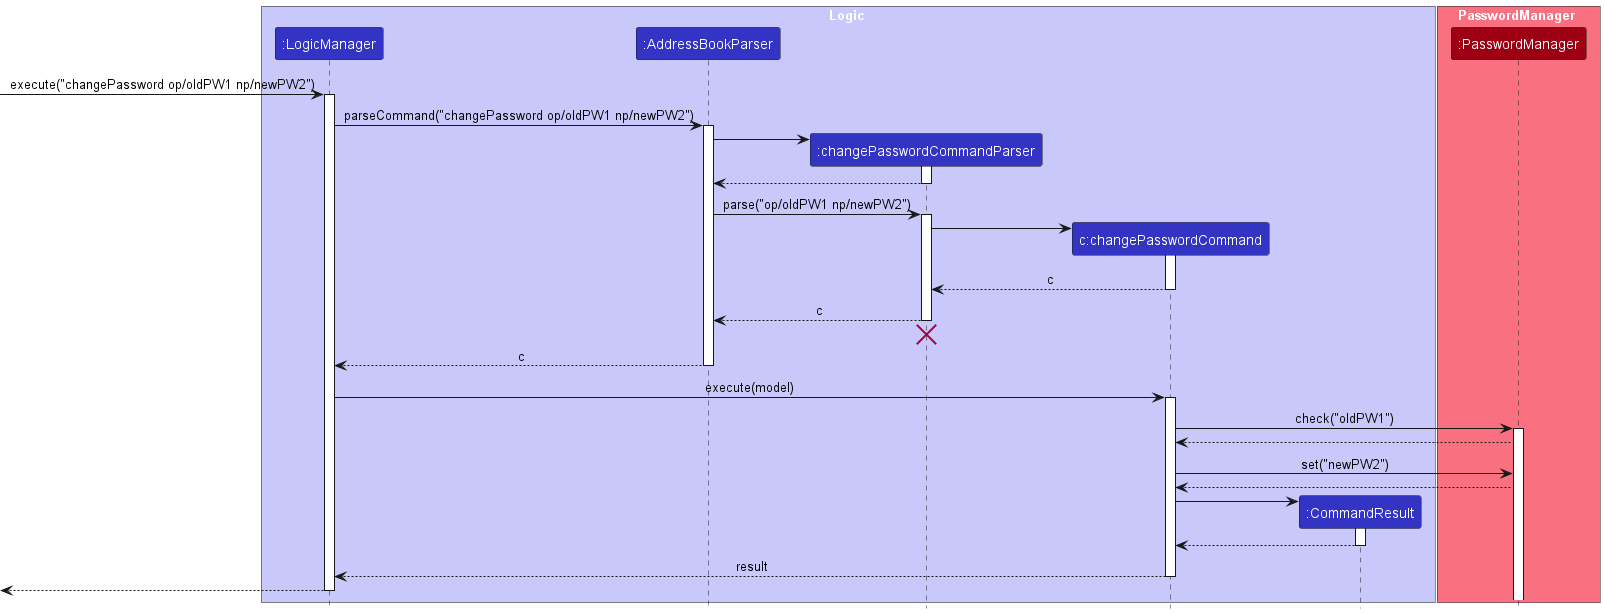
- The user launches the application and sets the password as "oldPW1" before entering InsuraHub with the password.
- The user wants to change the password and enters the commant
changePassword op/oldPW1 np/newPW2 - The
passwordManagercalls itscheckmethod on the old password given "oldPW1" to determine if the current password saved in encoded.txt in the data folder is indeed "oldPW1" - The
passwordManagerdetects that the old password is indeed correct and calls itssetmethod to set the new password as "newPW2" by modifying the string saved in encoded.txt in the data folder. - The UI will continue displaying the list of clients and a success message is displayed on the UI.
Activity Diagram for changePassword Command:
The following sequence diagram shows how the changePassword operation works:
Return to Table Of Contents
[Proposed] Undo/redo feature
Proposed Implementation
The proposed undo/redo mechanism is facilitated by VersionedAddressBook. It extends AddressBook with an undo/redo history, stored internally as an addressBookStateList and currentStatePointer. Additionally, it implements the following operations:
VersionedAddressBook#commit()— Saves the current address book state in its history.VersionedAddressBook#undo()— Restores the previous address book state from its history.VersionedAddressBook#redo()— Restores a previously undone address book state from its history.
These operations are exposed in the Model interface as Model#commitAddressBook(), Model#undoAddressBook() and Model#redoAddressBook() respectively.
Given below is an example usage scenario and how the undo/redo mechanism behaves at each step.
Step 1. The user launches the application for the first time. The VersionedAddressBook will be initialized with the initial address book state, and the currentStatePointer pointing to that single address book state.
Step 2. The user executes delete 5 command to delete the 5th person in the address book. The delete command calls Model#commitAddressBook(), causing the modified state of the address book after the delete 5 command executes to be saved in the addressBookStateList, and the currentStatePointer is shifted to the newly inserted address book state.

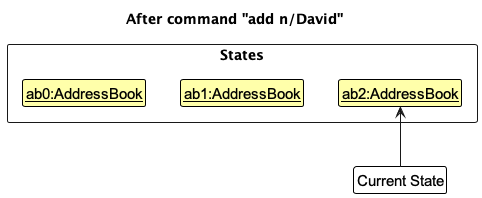
Step 3. The user executes add n/David … to add a new person. The add command also calls Model#commitAddressBook(), causing another modified address book state to be saved into the addressBookStateList.
Note: If a command fails its execution, it will not call Model#commitAddressBook(), so the address book state will not be saved into the addressBookStateList.
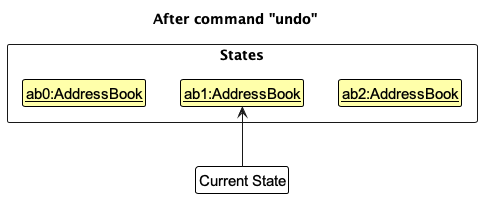
Step 4. The user now decides that adding the person was a mistake, and decides to undo that action by executing the undo command. The undo command will call Model#undoAddressBook(), which will shift the currentStatePointer once to the left, pointing it to the previous address book state, and restores the address book to that state.
Note: If the currentStatePointer is at index 0, pointing to the initial AddressBook state, then there are no previous AddressBook states to restore. The undo command uses Model#canUndoAddressBook() to check if this is the case. If so, it will return an error to the user rather
than attempting to perform the undo.
The following sequence diagram shows how the undo operation works:
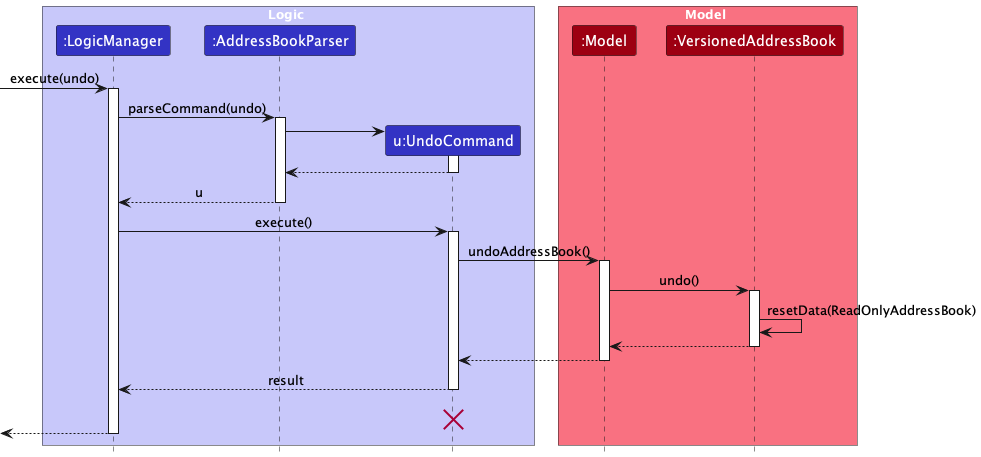
Note: The lifeline for UndoCommand should end at the destroy marker (X) but due to a limitation of PlantUML, the lifeline reaches the end of diagram.
The redo command does the opposite — it calls Model#redoAddressBook(), which shifts the currentStatePointer once to the right, pointing to the previously undone state, and restores the address book to that state.
Note: If the currentStatePointer is at index addressBookStateList.size() - 1, pointing to the latest address book state, then there are no undone AddressBook states to restore. The redo command uses Model#canRedoAddressBook() to check if this is the case. If so, it will return an error to the user rather than attempting to perform the redo.
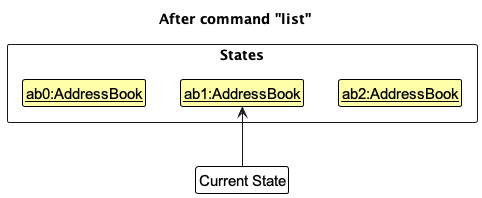
Step 5. The user then decides to execute the command list. Commands that do not modify the address book, such as list, will usually not call Model#commitAddressBook(), Model#undoAddressBook() or Model#redoAddressBook(). Thus, the addressBookStateList remains unchanged.
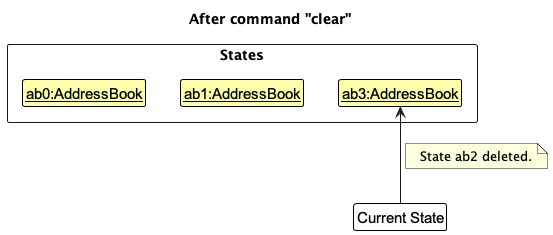
Step 6. The user executes clear, which calls Model#commitAddressBook(). Since the currentStatePointer is not pointing at the end of the addressBookStateList, all address book states after the currentStatePointer will be purged. Reason: It no longer makes sense to redo the add n/David … command. This is the behavior that most modern desktop applications follow.
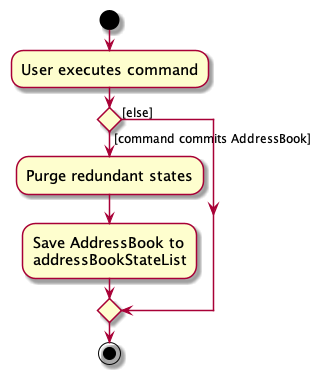
The following activity diagram summarizes what happens when a user executes a new command:
Design considerations:
Aspect: How undo & redo executes:
Alternative 1 (current choice): Saves the entire address book.
- Pros: Easy to implement.
- Cons: May have performance issues in terms of memory usage.
Alternative 2: Individual command knows how to undo/redo by itself.
- Pros: Will use less memory (e.g. for
delete, just save the person being deleted). - Cons: We must ensure that the implementation of each individual command are correct.
- Pros: Will use less memory (e.g. for
Return to Table Of Contents
Documentation, logging, testing, configuration, dev-ops
Return to Table Of Contents
Acknowledgements
This project is based on the AddressBook-Level3 project created by the SE-EDU initiative.
Return to Table Of Contents
Appendix: Requirements
Product scope
Target user profile:
- has a need to manage a significant number of client's contacts
- prefer desktop apps over other types
- can type fast
- prefers typing to mouse interactions
- is reasonably comfortable using CLI apps
- has a need to be able to easily find different clients contacts
- remembers some of their client's only by their firstname,lastname,nickname or initials
- needs to handle a large amount of documents that are stored for different clients
Value proposition: manage client's contacts faster than a typical mouse/GUI driven app while providing ways to efficiently find/store specific client and their documents
Return to Table Of Contents
User stories
Priorities: High (must have) - * * *, Medium (nice to have) - * *, Low (unlikely to have) - *
| Priority | As a … | I want to … | So that I can… |
|---|---|---|---|
* * * | new user | see usage instructions | refer to instructions when I forget how to use the App |
* * * | user | add a new person | |
* * * | user | delete a person | remove entries that I no longer need |
* * * | user | find a person by name | locate details of persons without having to go through the entire list |
* * | user | hide private contact details | minimize chance of someone else seeing them by accident |
* | user with many persons in the address book | sort persons by name | locate a person easily |
* * * | insurance agent | Add more tags to my clients | easily find them later |
* * * | insurance agent with multiple documents | Store documents along with client contact information | in an orderly manner |
* * * | insurance agent | Highlight the preferred contact details of my clients | quickly contact them for any matters |
* * * | insurance agent using the CLI | Input and update client information through text commands | provide personalized and efficient service without a graphical interface |
* * * | insurance agent | Filter interested clients | focus my time on providing value to their lives |
* * | insurance agent | Organize my clients’ records based on tags | filter for specific groups of clients |
* * | insurance agent | Cluster my clients into areas they want to meet | set up meetings that minimize my travel time |
* * | busy insurance agent | Load client data quickly | use the app even with high traffic and not waste time waiting |
* * | insurance agent | Sort client priorities | attend to their needs first |
* * | insurance agent prioritizing data security | Create secure log-in passwords and authentication | protect client data integrity |
* * | non-technical insurance agent | Access comprehensive help documentation or a built-in help command | understand available commands, their syntax, and purpose in CLI |
* * | forgetful insurance agent | Have important todos in the homepage | not forget to do them, such as client meetings and applying for claims |
* * | life insurance agent | Easily filter clients with policy updates | inform them more timely on the updates |
* * | insurance agent | Track progress of insurance claims through text-based commands | provide timely updates and ensure a smooth claims process via CLI |
* * | insurance agent | Receive alerts for expiring insurance policies | prioritize meeting clients with expiring policies |
* | insurance agent with traditional clients | Export a client’s policy summary to a spreadsheet | print it out for clients |
* | artistic insurance agent | Customize the UI | feel better using a more unique UI |
* | insurance agent | Create new insurance policies for my clients | accommodate changes or updates requested by clients |
* | insurance agent working with others | Send and receive client details with other users | take over/hand over clients from other agents |
* | data-driven insurance agent | Access a variety of reports and analytics | make informed decisions to improve my business |
Return to Table Of Contents
Use cases
If not explicitly mentioned, the actor will be a Financial Advisor and InsuraHub as the System.
Use Case 1 - Adding more tags to client records
Precondition: User knows the client index relative to the list and the client is added into the list of clients
MSS:
- User keys in all tags that is tied to the particular client
- Systems displays the tags that have been added to the particular client
Use case ends
Extensions:
1a. User did not add a tag
1a1. System displays an error message indicating that user have to key in at least one tag
Use case ends
Return to Table Of Contents
Use Case 2 - Deleting tags from client records
Precondition: User knows the client index relative to the list and the client is added into the list of clients, clients must also have the tag/tags listed in one of their tags.
MSS:
- User keys in tags that he/she want to be removed from the client tags
- Systems returns a new client without the tags that the user wants removed.
Use case ends
Extensions:
1a. User keys in a tag that is not in the tags that the client originally have.
1a1. System returns an error message stating that the tag is not present and that he/she needs to give a tag that is in the client list of tags.
Use case ends.
1b. User did not provide any tag to be removed
1b1. System returns an error message stating that one tag must be provided.
Use case ends
Return to Table Of Contents
Use Case 3 - Adding client preferred form of contact
Precondition: User knows the client index relative to the list and the client is added into the list of clients
MSS:
- User adds in the clients preferred form of contact.
- System updates with the preferred form of contact.
Use case ends
Extensions
1a. User adds in multiple forms of contacts
1a1. System displays an error message to tell the user to select only one form of preferred contact and that the
process of selecting preferred form of contact have failed.
Use case ends
1b. User adds in a invalid preferred form of contact.
1b1. System displays an error message indicating that user can only put in a preferred form of contact with a valid form of contact.
Use case ends
1c. User did not add in any preferred form of contact
1c1. System displays an error message indicating that the user have to put in at least one form of contact.
User case ends
Return to Table Of Contents
Use Case 4 - Filtering client information using tags
MSS:
- User filters using tags.
- System updates with a list of clients that fulfills the tags to be filtered.
Use case ends
Return to Table Of Contents
Use Case 5 - Storing client documents neatly in a folder
Precondition: User knows the client index relative to the list and the client is added into the list of clients
MSS:
- User keys in
filefollowed by index - System opens up the folder of the particular client with the relevant files inside the folder
Use case ends
Extensions
1a. User keys in invalid index
1a1. System displays an error message indicating that the process of creating a file for the user is stopped.
Use case ends
Return to Table Of Contents
Use Case 6 - Grouping clients based on the nearest MRT station from their residence to a region
MSS:
- User provides a region to be filtered
- System returns a list of clients who live in a particular region.
Use case ends.
Extensions:
1a. User keys in an invalid region
1a1. System returns an error message stating to put in a valid region to be filtered.
Use Case Ends
Return to Table Of Contents
Use case 7 - Delete a person
MSS:
- User requests to delete a specific person in the list
- InsuraHub deletes the person
Use case ends.
Extensions
1a. The given index is invalid.
1a1. InsuraHub shows an error message.
Use case resumes at step 2.
Return to Table Of Contents
Use case 8 - Filter Policy
MSS:
- User request to filter based on policy description
- InsuraHub show the list of people who have the policy
Use case ends.
Extensions
2a. The list is empty.
Use case ends.
Return to Table Of Contents
Non-Functional Requirements
- The application should be compatible with mainstream operating systems such as Windows, Linux, Unix, and macOS, as long as they have Java 11 or above installed.
- Should be able to hold up to 1000 persons without a noticeable sluggishness in performance for typical usage.
- A user with above average typing speed for regular English text (i.e. not code, not system admin commands) should be able to accomplish most of the tasks faster using commands than using the mouse.
- The application should ensure the integrity and consistency of data stored in the address book. Data should not be lost or corrupted during normal usage or unexpected errors.
- Any commands should be executed within 1s.
- The address book should be able to store 2000 clients' information.
Return to Table Of Contents
Glossary
- Mainstream OS: Windows, Linux, Unix, OS-X
- Private contact detail: A contact detail that is not meant to be shared with others
- Tag: A tag object assigned to a client that is a categorical description of the client
- Client Priorities: Priority of the client that the insurance agent has to attend to, where each priority is its own tag
- Usage Instructions: A quickstart guide with a short list of basic commands for users' reference within the App.
Return to Table Of Contents
Appendix: Instructions for manual testing
Given below are instructions to test the app manually.
Note: These instructions only provide a starting point for testers to work on; testers are expected to do more exploratory testing.
Launch and shutdown
Initial launch
Download the jar file and copy into an empty folder
Double-click the jar file
OR Open the command terminal,cdinto the folder you put the jar in and usejava -jar InsuraHub.jarcommand to run the application.
Expected: Shows the GUI shown below to ask you to set a password for first timers, first timers will then be asked to key in the password to enter the application.
Users who are not first timers will only be asked to enter the password that is previously saved.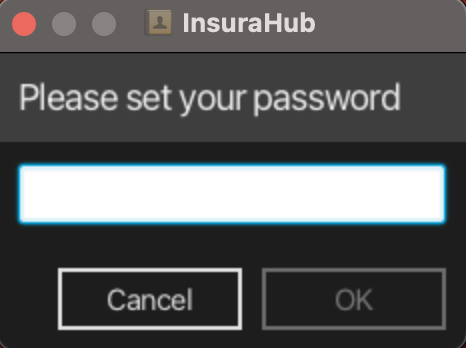
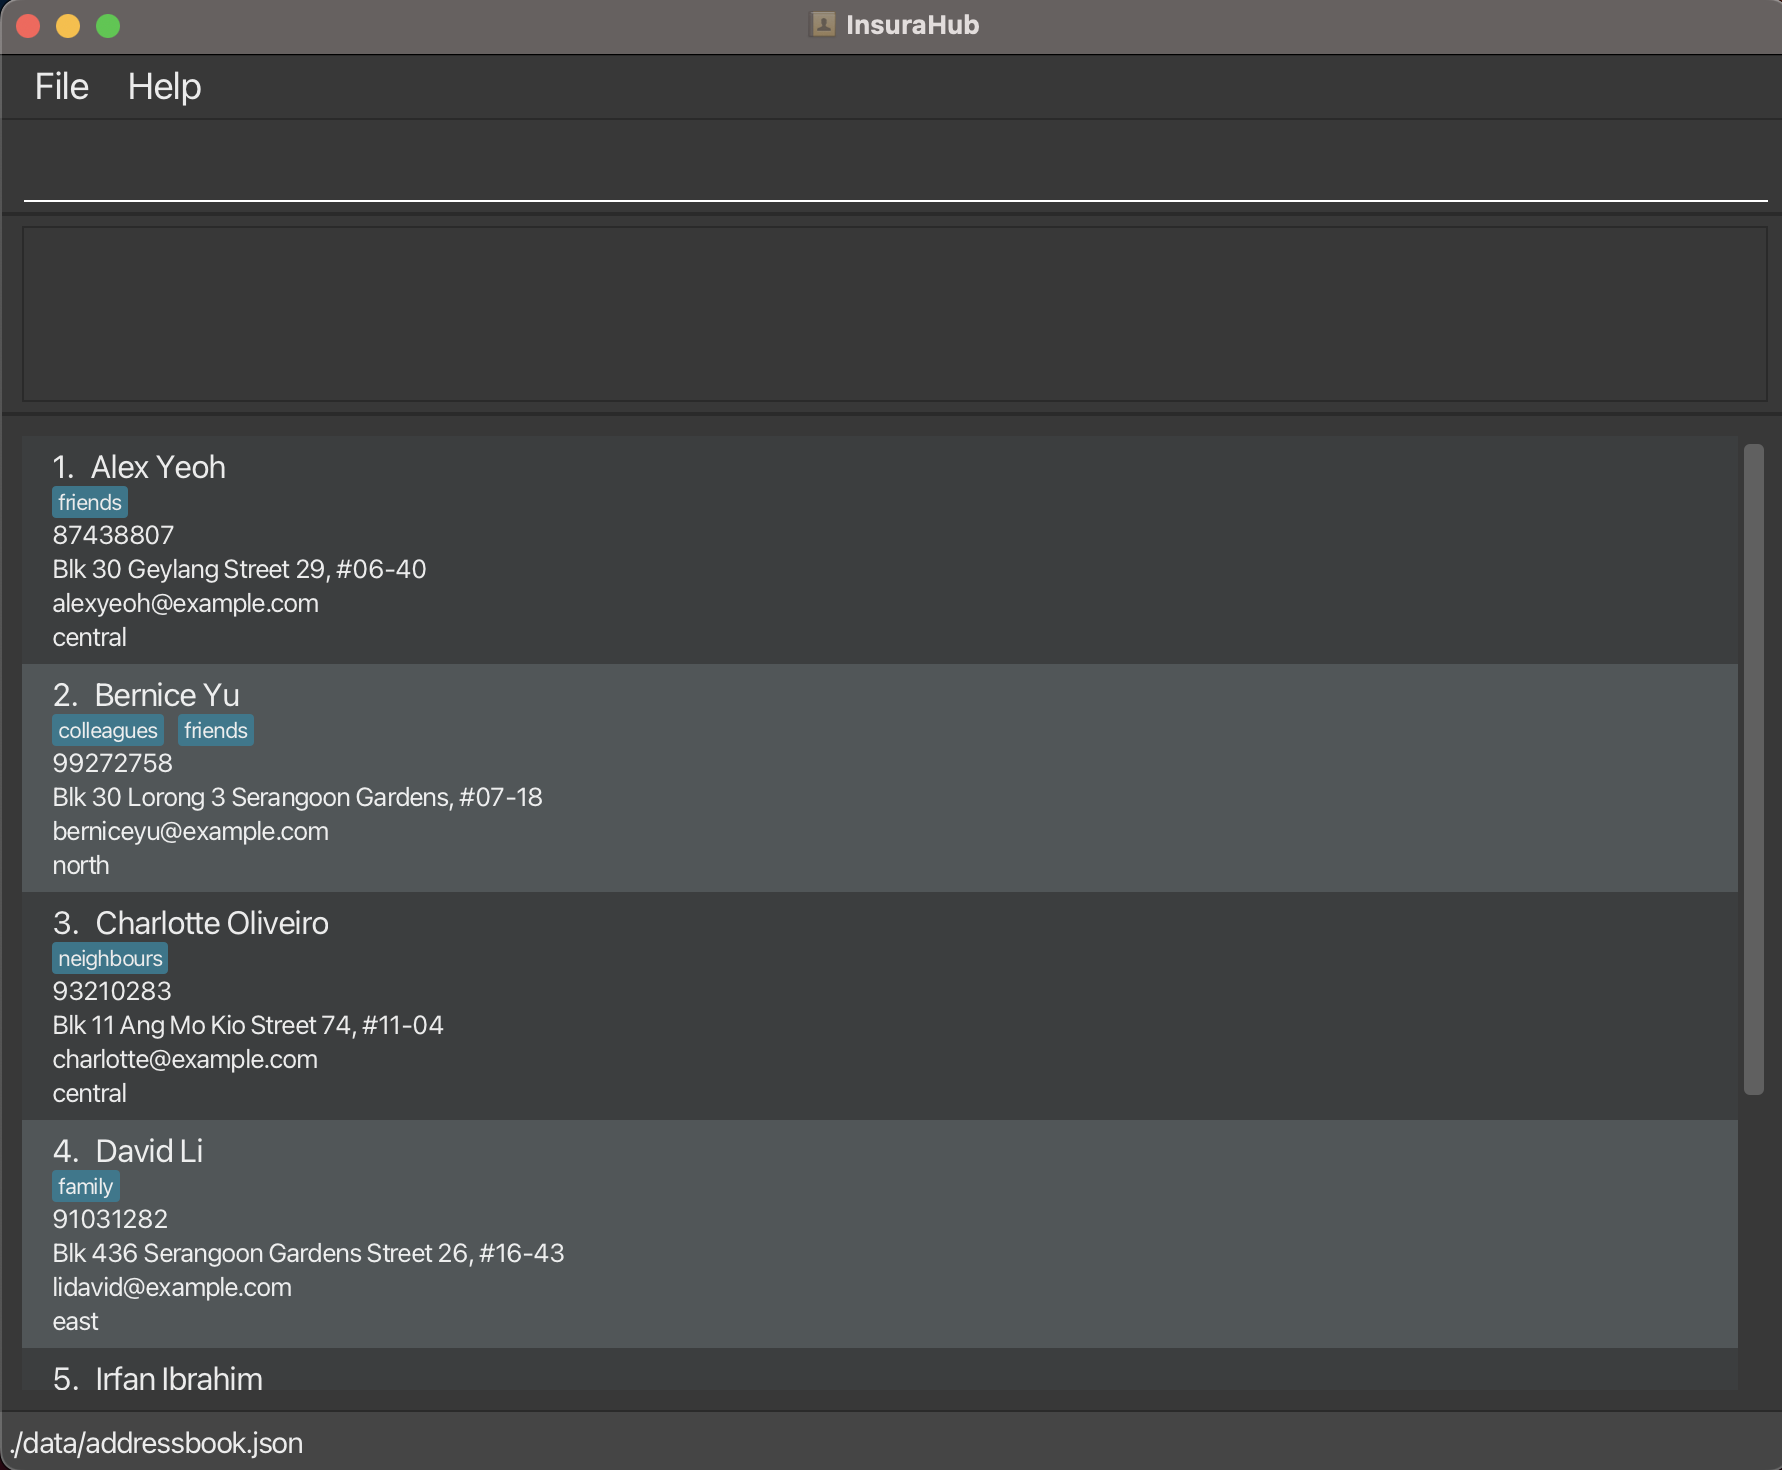
After the password is entered A GUI similar to the below should appear in a few seconds.
Saving window preferences
Resize the window to an optimum size. Move the window to a different location. Close the window.
Re-launch the app by double-clicking the jar file.
Expected: The most recent window size and location is retained.
Adding a client
- Adding a person while all persons are being shown
- Prerequisites: There should be no clients with the same name as the client you are adding.
- List all persons using the
listcommand. - Test case:
add n/John p/61234567 e/john@email.com a/Blk 312 Choa Chu Kang St 32 pmr/west
Expected: A new client is added and displayed in the client list. - Test case:
add n/John p/61234567 e/john@email.com a/Blk 312 Choa Chu Kang St 32 t/Friends t/Colleagues pmr/west
Expected: A new client with optional details is added and displayed in the client list.
- Prerequisites: There should be no clients with the same name as the client you are adding.
Deleting a client
Deleting a client while all clients are being shown
Prerequisites: List all clients using the
listcommand.Test case:
delete 1
Expected: First client is deleted from the list. Details of the deleted client shown in the status message. Timestamp in the status bar is updated.Test case:
delete 0
Expected: No client is deleted. Error details shown in the status message. Status bar remains the same.Other incorrect delete commands to try:
delete,delete x,...(where x is larger than the list size)
Expected: Similar to previous.
Adding Tags to a client
- Adding tags to an existing client
- Prerequisites: The client that is going to have the new tag is in the client list.
- List all clients using the
listcommand. - Test case:
addTag 1 t/Friends
Expected: The first client in the list will have the friends tag added, if it is already there, the new tag will replace the old tag.
- Prerequisites: The client that is going to have the new tag is in the client list.
Delete Tags from a client
Deleting tags from an existing client
- Prerequisites: The client that the user wants to remove the tag from is in the list, the client currently has the tag that have to be removed.
- List all clients using the
listcommand. - Test case:
deleteTag 1 t/friend
Expected: The first client in the list will have his friend tag removed from the client list.
Change Password
- The user will change the password that is required to enter the application. User still remember the old password, users who have forgotten the old password will need to retrieve it by going to
data/encoded.txt.- Test case:
changePassword op/OLD PASSWORD np/NEW PASSWORD
Do put in your current password intoOLD PASSWORDand the password you wish to have asNEW PASSWORD. Expected: After leaving the application, you will need to use the new password to enter into the application.
- Test case:
Adding a policy
- Adding a policy into an existing client
- Prerequisites: The client that is going to have the new policy is in the client list.
- List all clients using the
listcommand. - Test case:
addPolicy 1 pn/Health Insurance pd/Cancer Plan pv/2000.00 psd/2023-01-01 ped/2024-12-12
Expected: A new policy is added into the first client, the client details are shown, do note that you have to use viewPolicy to verify the policy you are adding is correct.
- Prerequisites: The client that is going to have the new policy is in the client list.
Removing Policy from a client
- Removing a policy from an existing client
- Prerequisites: The client that the user wants to remove the policy from is in the list, the client currently has policies to remove.
- List all clients using the
listcommand. - Test case:
removePolicy 1 1
Expected: The first client in the list will have his first (right-most) policy removed from his policy list. - Test case:
removePolicy 1 0
Expected: No policy is deleted. Error details shown in the status message. Status bar remains the same.
Adding a file for a client
- Adding a file for an existing client
- Prerequisites: The client that the user wants to add the file is in the list.
- List all clients using the
listcommand. - Test case:
file 1
Expected: There will be a file that contains the first client's name added into theClient Filesfolder, if the file is already there, it will be opened. - Test case:
file 0
Expected: No file is opened. Error details shown in the status message. Status bar remains the same.
Filter by tags
- Filter clients by tags.
- List all clients using the
listcommand. - Test case:
filter t/friend
Expected: Clients with the tagfriendwill be filtered and shown in the filtered list, status message will return the number of people with the tag. - Test case:
filter
Expected: There will be an error message stating incorrect command format, the example test case will be in the status message.
- List all clients using the
Filter clients by policy description
- Filter clients by policy description.
- List all clients using the
listcommand. - Test case:
filterpolicydescription Cancer Plan
Expected: Clients with policies containing policy descriptionCancer Planwill be filtered and shown in the filtered list, status message will return the number of people with the policy, do note that it is case sensative. - Test case:
filterpolicydescription
Expected: There will be an error message stating incorrect command format, the example test case will be in the status message.
- List all clients using the
Group Meeting
- Filter clients by preferred meeting region.
- Prerequisites: There are clients that have the region as their preferred meeting region.
- Test case:
groupmeeting northExpected: Clients with the preferred meeting locationwestwill be filtered and shown in the filtered list, status message will return the number of people listed with that preferred meeting location. - Test case:
groupmeeting
Expected: There will be an error message stating incorrect command format, the example test case will be in the status message.
Viewing details of client's policy
- Viewing the details of a client's policy.
- Prerequisites: The client that the user wants to view the policy of is in the list, the client currently has policies to remove.
- Test case:
viewPolicy 1 1Expected: The policy details (policy name, policy description, policy value, start date and end date) will be displayed in the status message. - Test case:
viewPolicyExpected: There will be an error message stating incorrect command format and that both indexes are required.
Preferred Contact
- Setting the preferred contact method for a client.
- Prerequisites: The client that the user wants to set the preferred contact method for is in the list.
- List all clients using the
listcommand. - Test case:
preferredContact 1 pc/phoneExpected: The preferred contact method of the first client in the list will be highlighted in yellow. - Test case:
preferredContactExpected: There will be an error message stating incorrect command format and an example command will be shown in the status message.
Toggle UI Mode
- Toggling the UI Mode between light mode or dark mode.
- Test case:
toggleModeExpected: Success message stating the mode has been changed and InsuraHub will be switched to the other mode upon the next launch.
- Test case:
Appendix: Planned Enhancements
1. Add Feature - Email Validation
Current State
The email parameter for adding a new client to InsuraHub currently only allows alphanumeric characters in the local-part for email addresses in the format local-part@domain.com
Planned Enhancement
The local-part will allow special characters which are commonly used in email addresses with the limitation of having no consecutive special characters together
2. Add Policy Feature - Invalid parameter and prefix name
Current State
No errors for Invalid prefixes:
- Having 2
pnprefixes (policy name) returns missing prefixes error - No error message on the UI for empty parameters such as an empty policy name
pn - The
policy descriptionshould be of the prefixpdin theaddPolicycommand but using an unknownprprefix that precedes the policy description does not throw any error - If
psdandpedare missing, it does not return an error on the UI and silently fails as a runtime error
Planned Enhancement
- The prefixes will be checked to ensure that the
addPolicycommand entered by the user is a valid command with the correct prefixes
3. Add Policy Feature - Special characters allowed
Current State
The Add Policy command currently allows for special characters such as ;; which is not how policies would be named
Planned Enhancement
Policy name and description will be checked through for special characters and corresponding error messages will be returned in the UI
4. Remove Policy Feature - Success message incorrectly formatted
Current State
The success message is currently not formatted properly with the details of the client wrapped in braces preceded by seedu.address.model….
Planned Enhancement
The success message will be formatted properly
5. Preferred Contact Feature - Parameters must be lowercase
Current state
The Preferred Contact command only accepts parameters in lower-case but there is no warning when the user enters a parameter in uppercase
Planned Enhancement
There will be error message returned in the UI when the user enters the parameters not in lowercase (either email or phone)
6. Add Policy Feature - End date can be earlier than start date
Current state
The end date of the policy can be earlier than the start date of the policy.
Planned Enhancement
There will be error message returned when the end date is earlier than the start date of the policy.
7. Client files is retained when clients are deleted or edited
Current state
Clients files in the client files folder is retained when clients are deleted or edited
Planned Enhancement
They will be edited or users will be reminded to edit or delete the files according when the client names are edited or deleted accordingly.
Return to Table Of Contents